Welcome To JPneonblue's Blog!

Thursday, June 6, 2013

Dripping Paint Nail Art
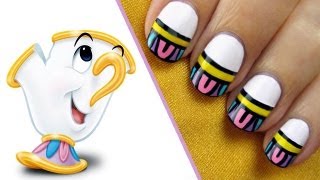
          Hello everyone! Welcome back! I actually decided to do a back to back post since I don't usually post two times a week. So anyway, today's design is very interesting and is very artistic. Today's design is........... Dripping Paint Nail Art!!!!! This design sets a picture in your mind of paint that actually looks like it is dripping down you nail. Now that I have told you a little bit about this design, let us get started!
Materials

  • a clear nail polish
  • a shear pink polish
  • a green polish
  • a blue polish
  • a yellow polish
  • a red polish
  • a big dotting tool
  • a small dotting tool
Steps to Making This Design

  1. First, apply a base coat to protect your natural nails.
  2. Next, paint your nail a shear pink polish. 
  3. Then, apply a top coat of clear polish on top of the shear pink. After the top coat dries, it will remove all the shine off your nail.
  4. After you are done, use a big dotting tool dipped into a blue polish to create the drips. Paint a fat vertical line in the middle of your nail. Make sure the line starts at the tip of your nail and then ends at the middle of your nail. Then, create one fat line at the right edge of your nail and at the left edge of your nail. 
  5. After you are done with step four, use a smaller dotting tool to connect the drips by making small curves between the drips. Then, fill in the spaces.
  6. Finally, paint a top coat only on the dripping paint to give an illusion of wet paint.
        And now you are finally done! For all the other nails, repeat the same steps you did to create the design, but for your other fingers use a green, red, and yellow polish. This design would also look very pretty on a rainbow kind of dress with different colors all over it. Well that's all for today. I hoped you enjoyed reading this post and hope you would like to read more of my posts! Make sure you remember to comment and tell me any suggestions that you have or anything that you liked about this post. BYE!
          Dripping Paint Nail Art
            
Seashell & Starfish Nails!
          Hello everyone! Welcome back! Today's design is related to the beach and is very cute. This design would also go with a mint green colored dress. Today's design is......... Seashell & Starfish Nails! Now you guys might understand why I said this design is related to the beach! This design isn't very complicated and it involves only a few steps. Now that I have told you a little bit about this design, let us get started!
Materials

  • a clear nail polish
  • a mint green colored polish
  • a turquoise polish
  • an orange polish
  • a mint green colored thin brush
  • a dotting tool
  • a toothpick
Steps to Making This Design

  1. First, apply a clear nail polish to protect your natural nails.
  2. Then, paint your entire nail with a mint green colored polish. 
  3. Next, use a dotting tool or toothpick dipped into turquoise polish to create the seashell. When creating the seashell, paint the seashell in the shape of a balloon. Then, fill in the shell. After you are done, create the base of the seashell by painting a horizontal line under the shell. If your nail is long enough, add another seashell.
  4. After you are done, use a dotting tool or toothpick dipped into an orange polish to create the starfish. When creating the fish, paint five lines in the shape of a star and then connect them. If you have more space on your nail, create a fraction of the starfish.
  5. After you are done with step four, use a mint green colored thin brush to create small vertical lines on the seashells. 
  6. For the starfish, use a toothpick dipped into the mint green colored polish and paint dots all over the starfish.
  7. Finally, apply a top coat to seal in your design and to add a beautiful shine.
           And now you are finally done! This design takes no time at all as I said before and would look gorgeous on your nails. This design would also look very pretty on a beach dress that has starfish and seashells all over it. Well this is all for today. I hope you enjoyed reading this post and keep checking out my blog to see more posts! Make sure you also comment below and tell me any suggestions you have and what you liked in this post. BYE!
                Seashell & Starfish Nails
                   

Sunday, May 19, 2013

Easy Ombre Leopard Nails
           Hello everyone! Welcome back! Today's design is very simple and very cute. This design can be worn anytime and anywhere. Today's design is........ Easy Ombre Leopard Nails! This design takes no time at all, and this design will look very pretty on your nails (in my opinion). Now that I have told you a little bit about this design, let us get started!
Materials

  • a clear nail polish
  • a white polish
  • a light pink polish
  • a medium colored pink polish
  • a dark pink polish
  • a black polish
  • a toothpick
  • a dotting tool/ bobby pin (optional)
Steps to Making This Design

  1. First, apply a base cost to protect your natural nails.
  2. Next, paint your nail with a white polish; let the white polish dry for about one to two minutes. After the white polish dries, apply another coat of white polish again on your nail.
  3. After you are done, use a dotting tool or a bobby pin to create a few light pink dots using a light pink polish at the bottom of your nail. Make sure you leave a little space between each dot.
  4. After you are done with step three, use a dotting tool or bobby pin to create a few medium colored pink dots using a medium colored pink polish in the middle of your nail.
  5. Then, use a dotting tool or bobby pin to create dark pink dots using a dark pink polish at the top part of your nail.
  6. Next, use a toothpick dipped into black polish to create small black parentheses around each dot. When making the parentheses, make sure you make small curved lines on each side of the dot and leave a little space between the curved lines. Then, use the toothpick dipped into black polish to create small black dots between the spaces.
  7. Finally, apply a top coat to seal in your design and to add a beautiful shine.
        And now you are finally done! This design looks very pretty and can be worn on any kind of pink dress. This design can also be worn on a leopard print dress. Well that is it for today! I really hope you liked this post and  hope you comment below to tell me how this post was and also give me any suggestions that you have. BYE!
            Easy Ombre Leopard Nails
                

Thursday, May 16, 2013

Chocolate Sauce & Sprinkles Nail Art
           Hello everyone! Welcome back! Today we will be doing a design that will make your mouth water from just hearing and looking at the design.
Today's design is.......... Chocolate Sauce & Sprinkles Nail Art!!! Now is your mouth watering, because mine is! Anyway, this design would look good on any kind of light pink dress. This design would also look really pretty when you are eating a strawberry or pink colored ice cream with chocolate sauce and sprinkles on it. Now that I told you a little bit about this design, let us get started!
Materials

  • a clear nail polish
  • a strawberry colored pink polish
  • a dark brown polish
  • a white striper
  • a red striper
  • a yellow striper
  • a green striper
  • a blue striper
  • a big sized dotting tool/ toothpick (optional)
Steps to Making This Design
  1. First, apply a base coat to protect your natural nails.
  2. Next, paint your whole nail a strawberry colored pink polish.
  3. Then, apply a top coat on top of the strawberry colored pink polish (this step is optional).
  4. After you are done with step three, use a big sized dotting tool dipped into a dark brown polish to paint the dripping chocolate sauce. For perfect chocolate sauce drips, press the dotting tool against your nail to get the big drips. Paint the drips from the tip of your nail going down to the middle of your nail. After you are done, use a big sized dotting tool or a toothpick to make small curved lines to connect the drips. Then, fill in the curved lines with a dark brown polish.
  5. After you are done with step four, use a white striper to create small thin lines on the chocolate sauce; the lines should be painted in different directions on the chocolate sauce and the small thin lines represent the sprinkles.
  6. Next, use a red striper or toothpick to fill in one of the sprinkles. Then, use a yellow striper or toothpick to fill in another sprinkle. After you are done, use a green striper or toothpick to fill in another sprinkle. Since the blue striper is left, use the blue striper or toothpick to fill in every other sprinkle. One sprinkle should not be painted with color, the sprinkle should be left white.
  7. Finally, apply a top coat only on the chocolate sauce so the chocolate sauce looks like it is wet and looks like it is dripping.
          And now you are finally done! This design can be worn anywhere and anytime. Well that is all for today. I hoped everyone enjoyed this cute little design and wish to see more. And one more reminder, remember to comment below and tell me any suggestions that you have for this post and what you liked. Bye!
P.S. Remember to keep following my blog and remember to keep checking out my blog for more new and cute posts! TOODLES!!!
        Chocolate Sauce & Sprinkles Nail Art
                             

Thursday, May 2, 2013

A Cherry Design
            Hello everyone! Welcome back! Today's design is very cute and takes no time at all. This design would also be great to wear in the month of May and June because that is the time when cherries grow and are ripe enough to be picked. Today's design is ........... Cherry Design!!! Now you might understand why I mentioned that cherries grow and might be ripe enough to be picked in the month of May and June. Now that I have told you a little bit about this design, let us get started!!!
Materials

  • a clear polish
  •  a white polish
  • a red polish
  • a green polish
  • a small paint brush 
  • a dotting tool
Steps to Making This Design

  1. First, apply a base coat to protect your natural nails.
  2. Next, paint your whole nail with a white polish.
  3. Then, use a dotting tool dipped into red polish and paint pairs of connected dots all over your nail. The red dots represent the cherries.
  4. After you are done with step three, use a small paint brush dipped into green polish to create the stem of the cherry. On the first dot create a small slanted line and then create another small slanted line on the second dot. Connect both of the small slanted lines and then paint a small horizontal line at the top part of the stem. 
  5. Then, dip the paint brush into white polish and paint small white dots on the cherries to highlight them.
  6. Finally, apply a top coat to seal in your design and to add a gorgeous shine.
            And now you are finally done! This design can also be painted on your thumb and ring finger if you want. And if you are painting your toe nails, you can paint this design on the biggest toe nail. Also, if you are painting this design on a certain finger or toe nail, you can paint the rest of your nails with a white polish. Well that is all for today! I hoped you enjoyed reading this post and do comment  below for any suggestions and how you liked this post. BYE!!!:):D:()
                      A Cherry Design
                   

Wednesday, April 24, 2013

Beauty and The Beast Nails!!!
             Hello everyone! Welcome back! Today's design is one of Disney's characters from the Beauty and the Beast; the character is Chip (the small teapot). This design is very cute and takes no time at all. Today's design is....... Beauty and The Beast Nails!!! Now that I have introduced you to this fabulous design, let us get started!!!
Materials

  • a clear nail polish
  • a white polish
  • a pink polish
  • a blue polish
  • a purple polish
  • a black striper
  • a yellow striper
  • a toothpick
Steps to Making This Design

  1. First, apply a base coat to protect your natural nails.
  2. Next, paint your nail with a white polish. After you are done painting the white polish on your nail, use a black striper and paint a horizontal line a few spaces down beneath the tip of your nail.
  3. Then, use a yellow striper and paint another horizontal line under the black line.  After you are done painting the yellow line, use the black striper again and paint a black horizontal line under the yellow line.
  4. After you are done with step four, use a toothpick dipped into pink polish to create a petal like shape. Make sure you paint the petal above the first black horizontal line (you are painting the petal on the tip of your nail) and make sure you place the petal on the middle of the tip of your nail.
  5. Next, use a toothpick dipped into blue polish to paint one blue line on the right and left side of the petal (make sure the blue lines are painted near the edges of the tip of your nail).
  6. After you are done with step five, use a toothpick dipped into purple polish to fill the rest of the empty spaces (the white polish areas ) on the tip of your nail.
  7. Then, use a black striper and outline all the shapes on the tip of your nail. Paint a small vertical line using the black striper in the middle of the pink petal. After you are done, use the black striper again and paint a thin black line at the tip of your nail.
  8. Finally, apply a base coat to seal in your design and to add a gorgeous shine.
             And now you are finally done! This design would look really cute on a Chip Halloween costume. This design would also look really nice on a dress, shirt, or pant that has a tribal print on it. Well that is all for today. I hope you really enjoyed this post and remember to enter my contest. And one more reminder, please do comment below and let me know how you liked this post and please tell me any suggestions that you have for this post or anything else that you would like to tell me! Bye! Toodles!!!!
                     
                 Beauty and The Beast Nails!!!
                     

Thursday, April 18, 2013

Spring Text
            Hello everyone! Welcome back! Today's design is very cute and the character in the design is also very famous. Today's design is.......... Hello Kitty French Nails!!! In my opinion, Hello Kitty is very cute  and would look even cuter on your nails. You can wear this design anywhere and on any kind of occasion. Now that I have introduced you to this design, let us get started!
Materials

  • a clear nail polish
  • a white polish
  • a red polish
  • a yellow polish
  • a dotting tool/toothpick
  • a black striper
  • Scotch Tape (optional)
Steps to Making This Design
( This design is meant to be painted on your ring finger).

  1. First, apply a base coat to protect your natural nails.
  2. Next, apply a white polish at the tip of you nails to create the French Tip. If you want, you can rip a piece of Scotch Tape and place the tape on the middle of your nail. Then, you can paint a white tip on the top of the piece of tape; this will make the French Tip look more neater and prettier.
  3. Then, to create Hello Kitty you will need to use a red polish, a yellow polish, and a black striper.  First, use a dotting tool or toothpick dipped into yellow polish to create Hello Kitty's nose. Paint the nose in the middle of the French Tip.
  4. After you are done with step three, use a dotting tool dipped into black polish to create Hello Kitty's eyes. Paint the eyes on the right and left side of the French Tip.
  5. Next, use a black striper to create Hello Kitty's whiskers. Paint the whiskers on the right and left side of the French Tip; when painting the whiskers, there should be three small lines on each side of the French Tip.
  6. After you are done with step five, use a dotting tool dipped into red polish to create the bow at the top left corner of the French Tip. When you make the bow, paint two lines going upward at an angle. Then, connect the lines and fill  the bow with red polish; do the same thing to the other side of the bow. 
  7. Finally, apply a top coat to seal in your design and to add a gorgeous shine.
           And now you are finally done! For your other nails you can paint a normal French Tip. This design can also look good on an outfit that has Hello Kitty on it, such as a shirt or dress. Well that is all for today! Please do comment below and let me know how you liked this design and post. And one last reminder, please do enter my contest!!!!! BYE!!! TOODLES!!!
                     Hello Kitty French Nails