Welcome To JPneonblue's Blog!

Wednesday, March 27, 2013

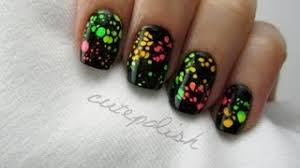
Water Spotted Nail Art!
                     Hello everyone! Welcome back! Today's design is fairly simple and catchy to the eye. You can wear this design anytime and anywhere since the colors pop out on anything such as simple dresses to  make the dress stand out. This design would also look great on any spring day since girls are more likely to wear neon since neon is the trend of spring. So, today's design is......... Water Spotted Nail Art! Since I've introduced you to this design, why don't we get started!
Materials

  • a clear nail polish
  • a white polish
  • a neon pink polish
  • a neon green polish
  • a neon yellow polish
  • a neon orange polish
  • a black polish
  • Scotch tape
  • a disposable cup
  • room temperature water
  • a hand sanitizer spray bottle
  • a toothpick
  • a cotton bud
  • nail polish remover
Steps to Making This Design

  1. First, apply a base coat to protect your natural nails.
  2. Next, apply a white polish on your nail. After you are done applying the polish, apply four different neon colors on your nail. First, apply a pink polish at the top left corner of your nail. Then, paint a neon green polish on the bottom left corner of your nail. Next, apply a neon yellow polish on the bottom right corner of your nail. Finally, paint a neon orange polish at the top right corner of your nail.
  3. Then, wrap Scotch tape all around the edges of your nail to make the cleaning process at the end easier.
  4. After you are done with step three, take a disposable cup and fill the cup with room temperature water. 
  5. Then, drop black polish onto the surface of the water three to four times. If the polish does not spread on the surface you might have to change the temperature of the water or use a newer bottle of nail polish.
  6. Next, you will need a hand sanitizer spray bottle. You can find these bottles at pharmacies or even Walmart. Quickly spray the hand sanitizer over the surface of the water. Spray the hand sanitizer over the surface of water one or two times depending on how big you want the spots to be.
  7. After you are done with step six, quickly line up your nail with the spots you like and dip your nail down on the spots. Wait for about ten seconds so that the polish on the surface of the water can dry. You can also blow lightly so the polish can dry faster. 
  8. Then, use a toothpick to remove all the excess polish from the water. After you are done, carefully remove your nail from the water. Then, use a cotton bud dipped into nail polish remover to remove all the extra polish at the edges of your nail.
  9. Finally, paint a top coat to seal in your design and to add a beautiful shine.
                  And now you are finally done! This design can match any neon dress of any color on any spring day. And as I said before, this design can make any dress stand out because of the neon that is all over your nail. Well that is all for today! I hoped you enjoyed this design and comment below for any suggestions and if you liked this design or not. See you next time! BYE!
                   Water Spotted Nail Art
                      

Tuesday, March 19, 2013

Cute Blueberry Nails!
                 Hello everyone! Welcome back! Today's design is a very simple and cute design. You can wear this design on a breezy and spring day, especially when the sky is  blue. Today's design is Cute Blueberry Nails! Now that I have introduced you to this design, let us get started!
Materials

  • a clear nail polish
  • a white polish
  • a green polish
  • a dark blue polish
  • a medium blue polish
  • a light blue polish
  • a striper
  • a dotting tool (Large in size)
  • a medium sized dotting tool 
  • a small sized dotting tool
Steps to Making This Design

  1. First, apply a clear or base coat to protect your natural nails.
  2. Then, paint two thin coats of white polish to make the polish opaque.
  3. Next, use a green striper to make three or four random lines to represent the vines on the blueberry. After you are done, use a dotting tool dipped into dark blue polish to create a few blueberries.
  4. After you are done with step three, use a smaller dotting tool dipped into a medium colored blue polish to create medium sized berries besides the large blueberries.
  5. After you are done, use a tiny dotting tool dipped into light blue polish to create a tiny blueberry next to the medium sized blueberry. Place a light blue dot inside the large blueberry and the medium sized blueberry.
  6. Then, place a smaller dark blue dot inside the light blue dot that is placed inside of the large and medium sized blueberry.
  7. After you are done with step six, use the green striper once again to create small leaves on the sides of the blueberries.
  8. Finally, apply a top coat to seal in your design and to add a beautiful shine.
              And now you are finally done! This design does not have to be done on every single nail, this design can be done on your thumb and ring finger if you want with all of your other nails painted in a white polish. You can wear this design anywhere and on any good spring day. You can wear this design especially when you go for blueberry picking since the blueberries are painted right on your nails. Well that is all for today! I hope you enjoyed this post and also comment below for any suggestions or anything you liked in this post! BYE!!!!
                      Cute Blueberry Nails
                    

Wednesday, March 13, 2013

Pearl and Pastel Nails!!!
                  Hello everyone!!! Welcome back! Today we will be getting back to our normal routine of new and pretty designs. For those of you who are born in June, you will definitely enjoy this beautiful design. Today's design is........ Pearl and Pastel nails!!! You can wear this design on your birthday or on any special occasion. Now that I have introduced you to this design, why don't we get started!

Materials 
  • a clear polish
  • a  pastel polish ( You can use any kind of pastel polish; for this design I chose a shear pink pastel polish).
  • a white striper
  • medium sized pearls
  • a toothpick
Steps to Making This Design 
  1. First, apply a solid base coat to protect your natural nails.
  2. Next, paint a shear pink pastel polish on your nail (You can use any color of your choice for this design; it is optional). Paint the nail polish at the tip of your nail.
  3. Then, use a white striper to create vertical stripes on the tip. Create two vertical stripes on the middle of the tip and one vertical stripe at the ends of the tip ( The right end and left end).
  4. After you are done with the third step, apply a top coat over your nail to seal in the design.
  5. Then, use a toothpick to apply on medium sized pearls on the bottom edge of the tip on your nail. The pearls can be bought from anywhere, even on online, such as on ebay.com.  
  6. Finally, after you are done, apply a fast drying top coat to seal in your design and to add a gorgeous shine!
                And now you are finally done! The other nails can have the same design and can also have different colored tips. This design can also look very pretty with a nice white flowy dress for any occasion. Well that's all for today. I really hoped you enjoyed this marvelous design and hope to try this design out! I have posted a picture of this design below this post so if anyone tries this design they won't get confused. Also, I wish everyone a very happy St. Patrick's day! And one last thing, don't forget to comment below on how you liked this post and of course if you have any suggestions! BYE!!!
                  Pearl and Pastel Nails  


Thursday, March 7, 2013

Painted Designs vs. Nail Stickers

Painted Designs
                      Hello everyone! Welcome back! Today we will be focusing on........ Painted Designs vs. Nail Stickers! In my opinion I think painted designs are much more better than nail stickers. The positive side of painted designs is that you get to make any design that you would like to make. The negative side of painted designs is that most designs take a while to make. For example, making flowers, they can take a while to make because you may need a dotting tool, a toothpick, etc.
                   Painted Designs
                     

Nail Stickers
                       Usually when girls go to any type of  girly store, they are most likely to pick up nail stickers for their nails. Nails stickers are usually very catchy to the eye. When a person sees  the nail stickers they are just so attempted to buy the stickers. In my opinion when I see nail stickers I don't quite look forward to buying them. The positive side about nail stickers is that they stick to your nails for about a pretty long time. The negative side of nail stickers is that they don't come in many different designs, compared to painting your own design.
                             Nail Stickers
                                                     
Painted Designs vs. Nail Stickers
                    Now that I have listed some positives and negatives about painted designs and nail stickers I have made a chart full of more positives and negatives about them. This chart tells you all the facts about each topic; this chart may convince some people to change their opinions. Also, I have a poll at the corner of my blog on which you can vote for whether you think painted designs or nail stickers are better. 
Let's Summarize It All Up!
                    Now as I said in my other post, we should respect everyone's opinion. In my opinion, painting your own design is better than nail stickers.   Every argument has two sides to it and in this case the argument is between painting designs and nail stickers. Each side has has its own positives and negatives which sometimes you can agree with and not agree with. At the bottom of this post, comment and tell me which side you agree with!
My Top Five List
                        Since I have told you enough about my opinions, I will tell the people who support nail stickers different brands about where they can find their need. The first nail sticker brand is, Sephora. Sephora's brand has textured bling effects to the nail stickers. The second brand is, Sally Hansen. This brand's nail stickers dry very quickly. The third brand is, Essie. Essie's nail stickers last on your nails for a long time. The fourth brand is, Revlon. This brand's nail stickers don't chip off easily. And the fifth brand is.........Wet N Wild. Wet N Wild's nail stickers are easy to apply onto your nails. Well that's all for today! I hope you enjoyed! And please don't forget to vote on the poll! BYE!!!
  
                             Sephora

                                              
                           Sally Hansen
                          
                                 Essie
                         
                                                                 Revlon
                                                  
                                                           Wet N Wild
                                                        

Wednesday, February 27, 2013

Gel Nails vs. Acrylic Nails
                    
Gel Nails
                   Hello everyone! Welcome back! Today we will be taking a break from nail designs and we will be focusing on  Gel Nails vs. Acrylic Nails! In my opinion gel nails are much more better than acrylic nails. The positive side of gel nails is that the gel nail polish doesn't damage your nails. The polish is just a thicker polish compared to a normal nail polish. The negative thing about gel nails is that they cost more. Since the polish is very thick and the polish  comes in many different colors, the nail polish is expensive.
                               Gel Nails
                 
Acrylic Nails
                   Acrylic nails are a best friend to every girl whether the girl is two years old or fifty years old. Acrylic nails are todays trend. I personally don't like acrylic nails because they can damage your nails, but there are many positives about these types of nails. Acrylic nails are very strong and can stick onto your nails for a longer time if you take care of them properly. When you are putting acrylic nails on, the process involves applying many chemicals on your nails. Too many chemicals on your nails are not good. 
                            Acrylic Nails 
                      
Gel Nails vs. Acrylic Nails
               Now that I have introduced you to the disadvantages and advantages of both gel and acrylic nails, I have put up a chart just to tell you a little bit more about the advantages and disadvantages. Also, after you are done reading this post, you may vote on the poll for either gel or acrylic nails; the poll is at the corner of my blog.


 Let's Summarize It All Up!
                      Everyone has a different opinion which we all should respect, but as I have stated before gel nails are better than acrylic nails. Each of them have their advantages and disadvantages. Now let me tell you guys something, when you look at the chart, which side has the most disadvantages? The answer is the acrylic nails side. Also, the affects of applying acrylic nails are very severe. Now, I am just telling you my opinion. You are always welcome to comment and suggest your own opinion on this topic and any other topic.
The Top Five List
                I will tell you guys the top five list of gel nail polishes. The first type of brand for gel nail polish is Couture. The Couture brand is very easy to remove. The second type of brand is IBD.  This brand's gel polish  does not chip off easily. The third type of brand is Sephora. This brand's nail polish looks very nice and lasts for a longer time on your nails. The fourth type of brand is Sally Hansen. This brand's nail polish dries up on your nail in no time. The fifth type of brand is Haute. This brand's nail polish is the shiniest polish.
Well that's all for today! I hope you guys enjoyed reading this post! Don't forget to comment and vote on the poll! BYE!
                                 Couture           


IBD


                              Sephora                            

Sally Hansen
                                       
                                                                   Haute


Monday, February 18, 2013

Cute Cupcake Nails!!!
                    Hello everyone!!! Welcome back!!! Today we will be doing ......... Cute Cupcake Nails!!! You can wear these nails anytime and anywhere. For example, these nails would suit a nice pink outfit or you can wear these nails on Pink Day. Now that I have told you a little bit about these nails, let's get started!
  Materials
  • clear nail polish
  • a light pink polish
  • a dark pink polish
  • a white polish
  • a dark pink striper
  • a dotting tool
  Steps to Making the Cupcake Design
    ( This design is only required to be painted on your index finger).
  1. First, apply a clear coat to protect your natural nails.
  2. Next, paint a light pink french tip at the top of   your nail.
  3. Then, use a dark pink striper and paint four vertical stripes on top of the light pink tip. Make sure the stripes are spread apart evenly.
  4. After you are done with the third step, use a  dotting tool dipped into white polish to create three curves that slightly cover the light pink polish. After you are done, fill in the top part of the cupcake.
  5. Then, use a dotting tool dipped into a dark pink polish to create a dark pink candy heart  at the top of the cupcake.
  6. Finally, paint a top coat on your nail to seal in your design and to add a beautiful shine.
     Steps to Painting Your Other Nails
           ( This design is only required to be painted on your thumb, pointer, ring, and pinky finger).
  1. Paint your nails a clear nail polish to protect your natural nails.
  2. Next, paint all of your nails not including the index finger a light pink polish.
  3. After you are done with the second step, use a dark pink striper to paint vertical stripes on all of your nails.
  4. Finally, paint a top coat on your nails to seal in your design and to add a beautiful shine.
                    And now you are done! Now you have many options to suit your nails. First, you can have a delicious cupcake to match the cupcake design on your nail. Next, you can either wear a cupcake shirt or a striped shirt. It is not necessary to wear the outfits I have given; you can wear your own made up outfit or anything pink. Finally, you can be a free for all and do anything you want with these beautiful designed nails. Well that's all for today! Also, if you have any suggestions and have tried painting these nails, please comment in the box below!  See you next time! Toodles!!!
                               Cute Cupcake Nails
                        

Thursday, February 14, 2013

Sweetheart Plaid Nails!!!
                  Happy Valentines Day everyone!!! Today we will do the most cutest and easiest design...... Sweetheart Plaid Nails!!! You can wear these nails on Valentines Day and on any kind of Valentines Day party. Now that I have told you a little bit about these nails, let us get started!
    Materials

  • clear nail polish
  • light pink polish
  • pink polish
  • a pink striper
  • a white striper
  • a silver glitter striper
  • a dotting tool or toothpick
  • Scotch Tape
  Steps to Making This Design

  1. Place a clear piece of Scotch Tape or any kind of tape diagonally across your nail. Make sure you press the tape down on your nail hard so the tape doesn't peel off.
  2. Then, paint the uncovered part of your nail with a clear polish to protect your nail.
  3. After you are done with step two paint your nail a light pink polish. After you are done painting the polish wait for ten seconds for the polish to dry; then peel the tape off of your nail.
  4. Next, use a pink striper to create a tic tac toe pattern on the painted part of your nail. Make sure you create two vertical lines and two horizontal lines on your nail.
  5. After you are done with step four, use a white striper to paint a horizontal line between the pink lines. Then do the same step over again, but now paint two vertical lines between the pink lines.
  6. Then, add some sparkles onto your nail by painting a diagonal line under the light pink polish using a silver glitter striper.
  7. After you are done, use a dotting tool or toothpick to create a pink heart at the bottom of your nail.
  8. Finally, paint a top coat on your nail to protect your design from smudging.
                  And now you are done! You can now enjoy wearing this design to your Valentines Day party. This design doesn't take a lot of time to make and this design is very pretty. Well that's all I have for today! And once again I wish all of you a very Happy Valentines Day!!! BYE!!!TOODLES!!!
                      Sweetheart Plaid Nails